Teacher Toolbox Tutorial

Are you thinking about making your own teacher toolbox? Maybe you’re like me and you’ve been thinking about it for years.
Perhaps some of the following sound familiar:
I SHOULD MAKE ONE BUT…
- They look really BIG! I don’t have enough space for one on my desk.
- I’m already pretty organized so I don’t need one.
- The drawers look too small to hold my stuff.
- Waaaay too many drawers. I wouldn’t have enough to fill them.
- Who has time for that?! It looks like a lot of work!
The Truth About Teacher Toolboxes
Let’s start with my biggest concern (literally) – the size.
When the toolbox arrived, I was relieved to see that it was smaller than I’d anticipated.

The toolbox is compact and doesn’t take up too much precious desk space. WIN!
This 26 Drawer toolbox from Akro-Mils easily fits on a desk or shelf. They have a variety of sizes so you can find one that best meets your needs.
Once I started brainstorming items for the labels, I realized how much time I’ve spent searching for these items over the years.

How much precious time have you spent searching for these items?!
Even when you try your best to keep an organized classroom, things get hectic and items get misplaced.
The toolbox makes it easy since so many items are in one spot. No more searching through desk drawers and baskets!
Another bonus: substitute teachers will love you for having this on your desk!
My original concern that I wouldn’t have enough to fill the drawers was immediately put to rest once I realized how many little bits and bobs I use on a daily basis. Who knew?!

Highlighters, pens and markers fit in the large drawers.
The drawers are 6″ deep so most pens, highlighters and markers will fit on an angle.
Choose Your Toolbox
There are LOTS of options out there when it comes to choosing your teacher toolbox.
The size you choose depends on what you want to store in it and how much space you have available.
Think about where you’ll keep your box…on your desk, a shelf, counter, etc.
I’ve designed my labels to fit the Akro-Mils toolboxes. Here are a few of the most popular options. You can click the photos to see them on Amazon.
The 16 Drawer toolbox is the most compact
This option has 24 large drawers
The 26 drawer unit was my pick!
This 44 Drawer unit is the ultimate organizer!
Putting It Together!
Once you’ve selected your toolbox, it’s time to choose your labels. This is the fun part as there are unlimited possibilities!

Print labels on card stock. You can find the link to the specific paper I use on the Amazon Classroom Finds page.
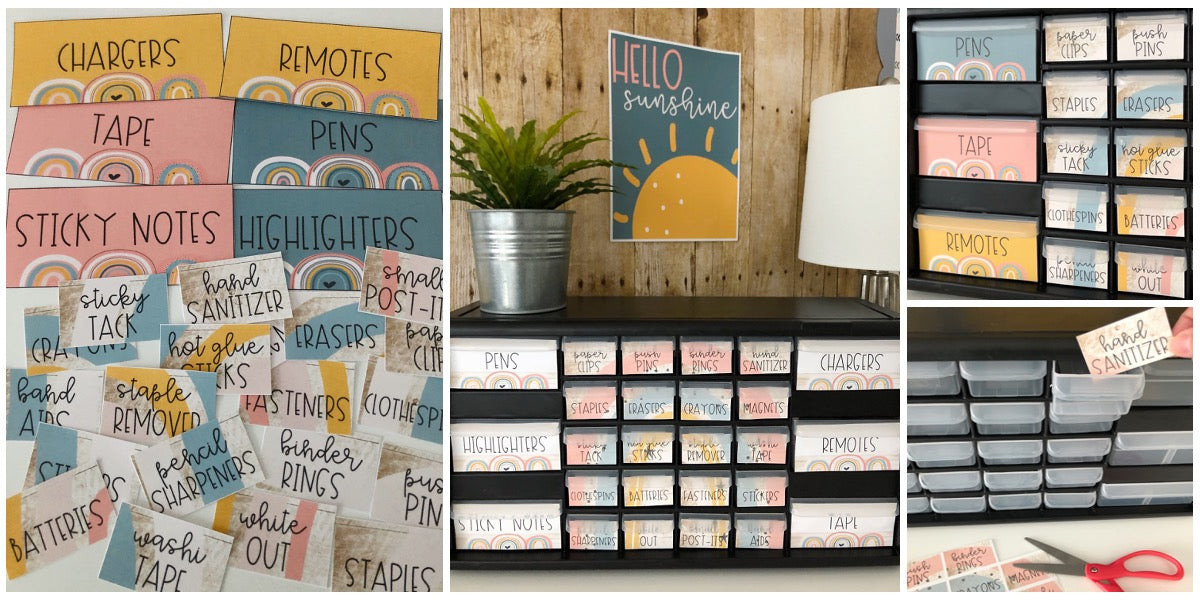
The labels above are from my Boho Rainbow Teacher Toolbox resource. It has a variety of editable styles so you can mix & match to customize your toolbox!
Empty That Junk Drawer!
TIP: Gather items that you’ll be placing in your toolbox FIRST!
Check your desk drawers (especially the junk drawer) so you’ll be sure to create homes for everything.
You’ll be amazed at just how many odds & ends you have lying around once you start looking for them!
Things like remotes and classroom doorbells can also find a new home in your toolbox.
Once you know what’s going in your toolbox, you can use the editable option to customize your labels.
Organize As You Go

Tip: Place labels in drawers as you go!
If you’ve chosen labels that create a pattern (like the rainbow above), place the labels in the drawers as you cut them.
This will save you from having to put the ‘puzzle’ together later!

Organizing as you go saves time later. Trust me on this one!
Attaching Your Labels
You may wish to laminate your labels before attaching them.
I chose not to since my kiddos won’t be handling the toolbox and the labels won’t be facing much wear and tear.
Many people use double sided tape to attach their labels.

For most of these Akro-Mils toolboxes you’ll be attaching the labels to the outside of the drawers because there is a ridge inside the large drawers.
You’ll also be able to see the labels better this way.
I tried the double sided tape but ultimately pulled out my trusty hot glue gun. Just a couple of dabs in the corners and we’re good to go!

TIP: line up the label with the BOTTOM of the drawers.
My best piece of advice for attaching the labels is to line them up with the bottom of the drawer.
The top part is hidden behind the drawer pull so it’s okay if it doesn’t quite reach all the way to the top.
Getting the bottom lined up straight is the most important for a beautiful toolbox!

Let The Organization Begin!
Once you’ve attached the labels, your toolbox is ready to become your organizational BFF! Grab all those bits & bobs and put them in their new homes!
I like to keep pens in the top drawer for quick access!

Keep it in a location that is easily accessible so you won’t be tempted to toss items in a more convenient spot.
You’ve made the effort to create your toolbox so you want to make sure you make the most of it!
If you’re looking for a BOHO RAINBOW theme for your toolbox, all of the labels above are included in my Boho Rainbow Teacher Toolbox Editable Labels resource!
Click the photo below to get started on your own teacher toolbox!

You can also see the entire collection of Teacher Toolbox Labels to find the perfect design for your classroom!
Happy Organizing!


